You stare at your favorite pair of jeans, a ragged hole at the knee mocking your laundry pile. Trash bin or second chance? One afternoon, you grab colorful thread and an embroidery hoop. Bright stitches turn the tear into bold art. Suddenly, those jeans shine again.
Visible mending flips repairs into design features. You don’t hide flaws. Instead, you celebrate them with stitches that pop. An embroidery hoop keeps fabric tight, so your lines stay straight and neat. Perfect for beginners who want clean results fast.
This guide walks you through everything. You’ll learn visible mending basics, hoop selection, setup steps, simple stitches, and pro tips. No fancy skills needed. Just basic supplies and a bit of patience. Grab a hoop today. Your worn clothes wait to sparkle.
What Is Visible Mending and Why Start with an Embroidery Hoop?
Visible mending fixes tears or holes with decorative stitches. You make the repair the star, not a secret patch. Think sashiko patterns or embroidered motifs. The result looks intentional, almost like artwork on denim or wool.
This method saves cash because you skip new buys. It cuts waste too. Your old sweater gets new life with a floral mend. Clothes gain personality. A plain tee turns unique with geometric lines.
Start with an embroidery hoop for best results. It clamps fabric taut. Stitches stay even without puckers. Without one, cloth bunches. Your lines wobble. Beginners love hoops because they forgive small errors.
Hoops cost little. Projects finish quick. Stitching relaxes you after a long day. Plus, it’s eco-smart. Mend a sock heel with contrasting thread. Repair an elbow hole on a shirt. Each fix boosts confidence.
In addition, visible mending fits busy lives. You work in short bursts. Results impress friends. They ask how you did it.
Quick History and Inspiration Behind Visible Mending
Visible mending roots in Japanese boro. Poor farmers patched quilts with rough stitches. Patches layered over time. Beauty emerged from need.
Today, upcyclers revive it. Post-2020, sustainable fashion boomed. People ditch fast clothes for lasting fixes. Social media sparks ideas. Scroll feeds for patchwork jeans or knit darns.
These stories motivate. You see everyday folks mend heirloom dresses. Their work inspires your first try. Simple tools yield pro looks.
Key Advantages of Using a Hoop for Your First Mends
Hoops ensure even tension. Fabric pulls flat, so stitches align. Adjustable screws let you tweak tightness.
Sizes fit spots like cuffs or knees. You carry hoops anywhere. Stash one in your bag for travel mends.
Freehand mending causes issues. Cloth shifts mid-stitch. Results look wavy. Hoops solve that. Beginners get neat work fast.
Most importantly, hoops build skills. You focus on thread, not wrestling fabric. Practice turns shaky hands steady.
Selecting Your First Embroidery Hoop and Essential Supplies
Pick a hoop that suits clothes. Bamboo works best for starters. A 6-inch size handles most tears. Wood grips fabric without slipping.
Plastic hoops feel light. They suit kids or quick jobs. However, they loosen easier. Spend $5 on bamboo. It lasts years.
Sizes range from 4 to 8 inches. Small ones fix socks. Larger frames cover jean knees. Match hoop to tear size.
Grab embroidery floss next. Cotton threads hold color well. Choose bright packs for fun pops. Needles sizes 5 to 10 pierce cloth smooth.
Sharp scissors cut thread clean. A water-soluble pen marks lines. It vanishes after washing. Total cost stays under $20.
Buy at craft stores. Online basics ship fast. Test hoop on thick denim. Loosen it after each session. This prevents creases.
Care matches fabric weight. Thin tees need gentle pull. Heavy jackets take firmer hold.
Best Hoop Sizes and Materials for Clothing Repairs
Small 4-inch hoops shine for socks or collars. They center tiny holes. Medium 6-inch hoops mend knees or elbows best.
Large 8-inch ones cover hems. Plastic stays light but slips on wool. Wood bites in for stability.
Bamboo balances price and grip. Avoid metal unless you frame art. Test on scrap first.
Must-Have Threads, Needles, and Tools to Get Started
Cotton floss resists pulls. Six-strand packs split for fine work. Crewel needles handle thick weaves.
Add a thimble for safety. It guards fingers from pricks. Beeswax smooths thread. Scissors stay razor-sharp.
These tools launch you. No extras clutter your kit.
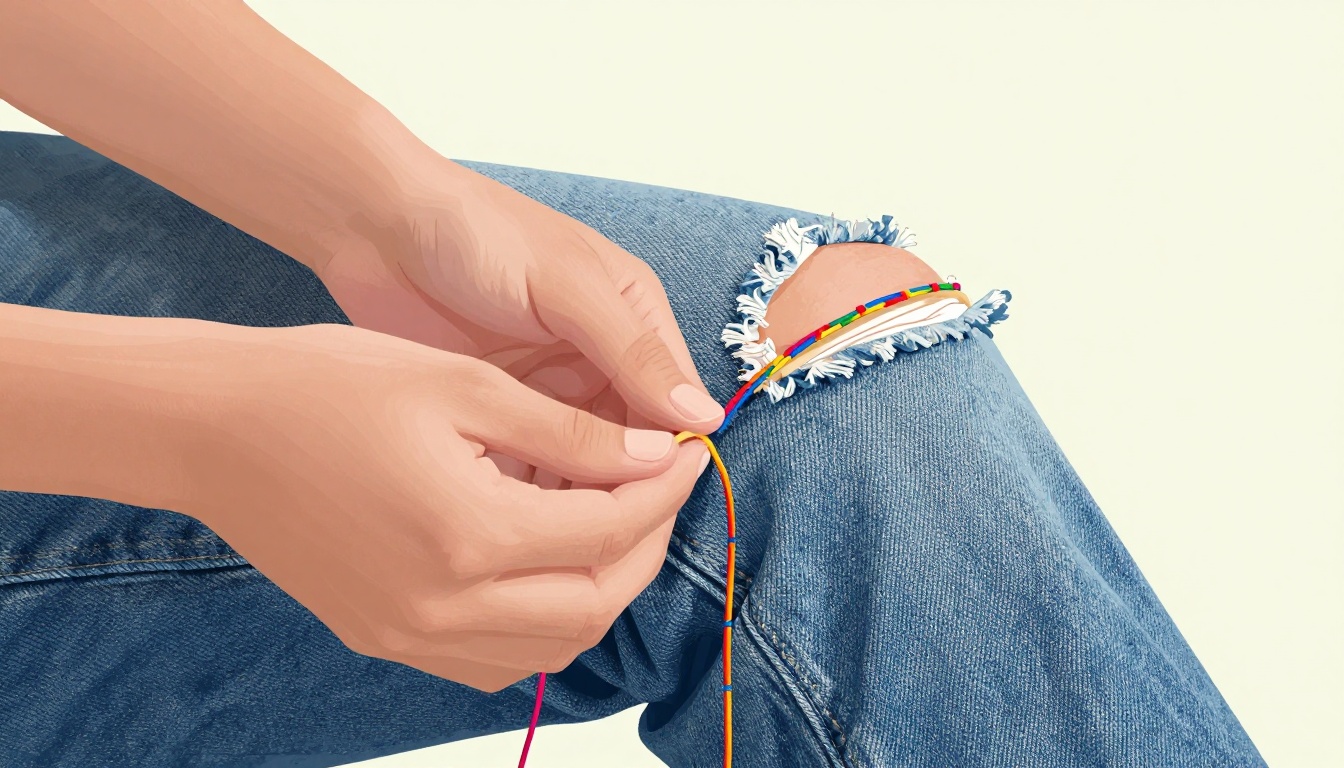
Step-by-Step: How to Set Up and Start Mending in Your Hoop
Set up takes minutes. Practice on scrap cloth first. Good lighting helps. Sit comfy.
Follow these steps for a hole mend:
- Lay inner hoop flat. Drape fabric over it, tear centered.
- Fit outer hoop over top. Push down even.
- Tighten screw a quarter turn at a time. Tug fabric taut like a drum.
- Trim loose threads around hole.
- Mark outline with water-soluble pen. Draw simple shape.
- Thread needle with two floss strands. Knot end.
- Start running stitch around edge. In one side, out the next.
- Fill hole with crisscross lines. Add decorative loops.
Work slow. Check tension often. Undo mistakes easy.
This method suits jeans or knits. Results look pro.
Positioning Torn Fabric Perfectly in the Hoop
Center the tear midway. Smooth wrinkles with hands.
Damp cloth softens stiff denim. Pat dry before hooping. Avoid over-tightening. Fabric distorts.
Rotate hoop for access. Pins hold edges if needed.
Your First Stitches: From Outline to Eye-Catching Design
Outline with running stitch. Space evenly, about needle width.
Fill with back stitches. They lock lines tight. Layer satin stitches for shine.
Mix two colors. Blue outline, red fill. Texture builds depth.
Easy Stitches and Creative Ideas to Make Mends Pop
Whipstitch edges fast. Loop thread around raw cloth. It secures without bulk.
French knots add dots. Wrap thread twice, push needle through. Perfect accents.
Chain stitch borders curve smooth. Pull loop under next stitch.
These build designs. Heart on a pocket draws eyes. Floral knee hides wear.
Geometric lines suit socks. Mix patterns for personality. Start simple, layer up.
Darning weaves fill big holes. Tease that for later.
Customize fits you. Bold threads for jeans. Subtle on blouses.
Beginner-Friendly Stitches That Hide Nothing
Running stitch: Up, down, repeat. Base for all.
Back stitch: Forward, back over hole. Strong line.
Satin stitch: Side by side fills. Smooth shine.
Whipstitch: Around edges only. Quick seal.
Practice each on scrap. They stack easy.
Fun Project Ideas to Practice Your New Skills
Patch elbows with stars. Outline, fill with knots.
Repair hems with chains. Add beads for flair.
Fix bag straps geometric. Scale to confidence.
Small wins stack fast.
Common Mistakes to Skip and Tips for Flawless Results
Skip loose hoops. They cause waves. Check tightness every few minutes.
Wrong needles tear thin cloth. Match size to fabric.
Rush knots tangle thread. Pull slow.
Use beeswax for glide. Organize floss by color.
Short sessions prevent fatigue. Celebrate each mend.
Question: What’s your first project?
Fixing Puckered Fabric and Uneven Stitches
Puckers mean loose hoop. Loosen, reposition, retighten.
Uneven lines? Count stitches. Rip out section, restitch.
Start over if big mess. Scrap practice helps.
Long-Lasting Tips to Keep Your Mends Looking Fresh
Wash inside out cold. Air dry flat.
Iron low from back. Avoid direct heat on stitches.
They hold through wears.
Turn Wear into Wearable Art Today
Embroidery hoops make visible mending simple and fun. You get taut fabric, straight stitches, bold designs. Start small. Mend a sock or tee. Rewards come quick.
Grab supplies now. Hoop up that hole. Share your before-and-after pics online. Others cheer you on.
Stitching saves clothes and sparks joy. What will you fix first? Your trash pile holds treasures. Stitch them alive.