Ever stared at a ball of yarn and wondered if you could weave something beautiful right at home? You can, and it starts with a cardboard box you might toss in recycling. Warping a loom means threading long strands across it to create the base for your weave. This setup holds everything steady so your project stays flat and even.
A DIY cardboard loom suits beginners perfectly because it costs almost nothing, assembles fast, and forgives small errors. You will not need fancy tools or skills. This post walks you through materials, building the frame, prepping yarn, and warping step by step. In under 30 minutes, you will have a loom ready for wall hangings or coasters. Get set to turn scrap into art.
Gather Everyday Materials for Your Cardboard Loom
Start with sturdy cardboard from a box, at least 8 by 10 inches. Thick material resists bending under tension, so pick cereal or appliance boxes. Scissors cut clean edges without fraying.
Grab a ruler or measuring tape next. It ensures even slits for uniform threads. You need acrylic yarn or wool in one color for the warp, about 50 to 100 yards. Smooth yarn slides easily and holds knots well.
A tapestry needle or crochet hook helps adjust threads later, but it is optional. Painter’s tape or masking tape secures ends firmly. All these items come from dollar stores or your home, so costs stay low. This keeps crafting open to everyone.
Recycle boxes for free cardboard. Buy yarn in basic packs if you lack some. Prep everything first to avoid stops. You now have what you need.
Build Your Simple Cardboard Loom in Minutes
Cut a rectangle 8 inches wide by 10 inches tall. This size works for small projects like coasters. Larger ones, say 12 by 16 inches, suit scarves if you want.
Mark slits along top and bottom edges. Space them 1/4 inch apart, about 1/2 inch deep. Aim for 30 to 40 slits per side. This density gives a tight weave.
Use your ruler for straight lines. Cut slowly to avoid tears. The frame now holds warp threads taut without glue or extras.
Cut and Notch Your Cardboard Perfectly
Measure edges first. Mark every 1/4 inch with a pencil. Cut slits straight down.
Practice on scrap cardboard. It builds confidence. Deep slits, around 1/2 inch, keep yarn from slipping out.
Even spacing matters because it prevents gaps in your weave. Check twice before final cuts.
Test Your Loom for Strength
Flex the frame gently. It should not bend much. Neat slits mean no weak spots.
If it gives too easily, add tape along edges. This reinforces without bulk. Your loom now lasts several projects.
Choose and Prep Your Warp Yarn Right
Pick smooth, plied yarn. Fuzzy types snag and tangle. Acrylic works well because it stretches little.
Calculate yarn needs roughly. Multiply loom height by 2, add 12 inches for knots, then times number of ends. For 30 ends on a 10-inch loom, you need about 75 yards.
Wind yarn into a loose skein or ball. This prevents knots during use. Choose one color for a plain base, or patterns if you want visible warp.
Soak natural fibers like wool first. It softens them and stops breaks. Tie ends loosely to avoid tangles. Prep now saves frustration later.
Color choice affects your look. Solids keep focus on weft patterns. You are ready to warp smoothly.

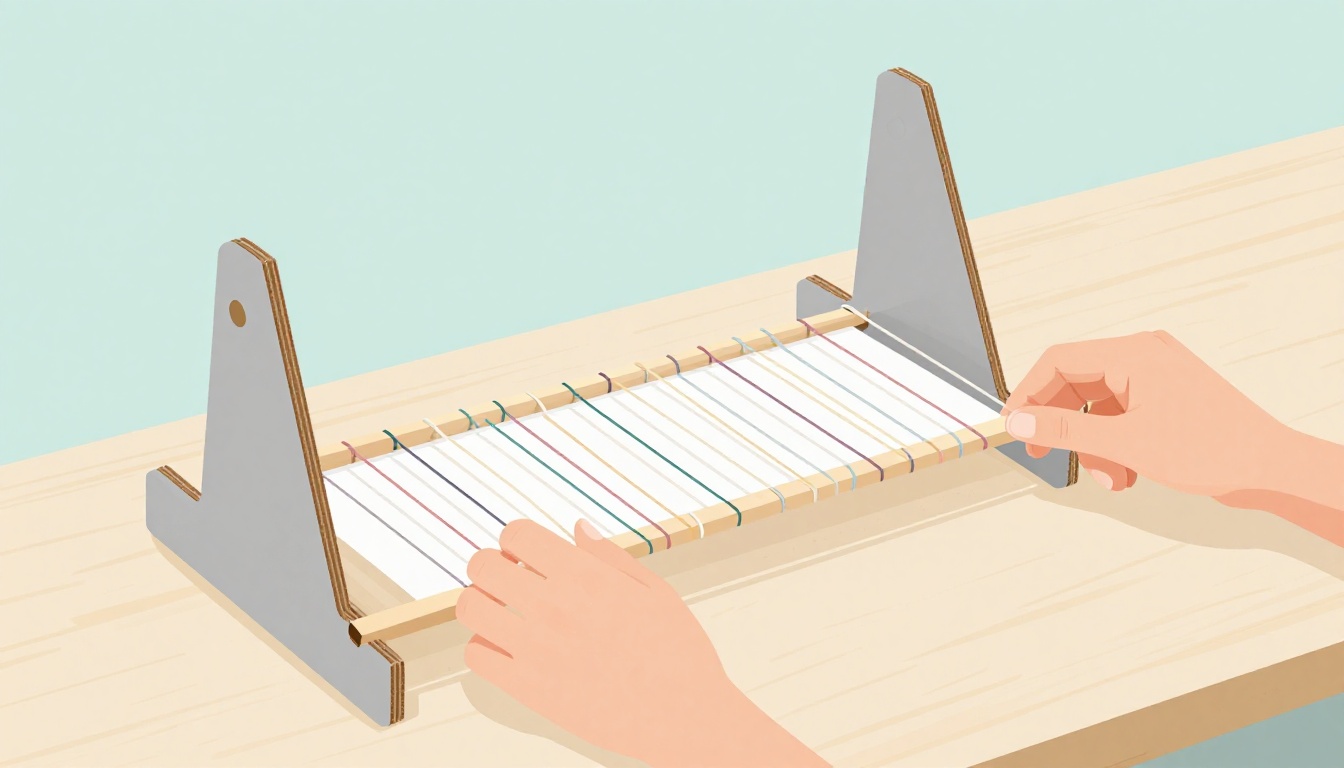
Follow These Steps to Warp Your Loom Evenly
Secure one yarn end with an overhand knot in the first bottom slit. Pull it snug.
Go straight up to the matching top slit. Loop around the back, then down to the next bottom slit. Repeat across all slits.
Pull each thread gently for even tension. It feels like tuning guitar strings, not too tight. At the end, knot securely in the last slit.
Tape loose ends if they slip. This method uses one continuous strand for simplicity. Even tension keeps weaves flat.
Adjust sags with a needle. Patience pays off, especially first time.
Secure the First and Last Warp Ends Firmly
Use overhand or square knots. They grip notches without slipping.
Wrap extra yarn around for hold. Test by tugging. Secure ends prevent unraveling.
Maintain Steady Tension as You Go
Pull snug each pass. Avoid twists by keeping yarn flat.
Walk around if your loom sits flat. Check often. Steady pull means no loose spots.
Even Out Your Warp Threads Smoothly
Comb threads with fingers after warping. Space them evenly in slits.
Tug gently on sags. This fixes pulls fast. Your warp now sits perfect.

Avoid Beginner Mistakes and Add Finishing Touches
Skip no slits, or gaps appear. Loose knots let threads sag. Twisted yarn puckers fabric.
Rewarp small sections if needed. A shed stick helps lift threads evenly. Label ends per inch on the frame for reference.
Wind extra warps ahead. Mix colors for stripes. Start with a bookmark project.
Blunt scissors suit kids for safety. These tips build skills quick.
Spot and Fix Tension Troubles Fast
Sagging means loose knots. Loosen others to balance.
Puckers show overtight spots. Redistribute pulls evenly. Fixes take seconds.
Experiment freely now. Your loom invites creativity.
You gathered basic supplies from home. You built a strong frame with clean notches. You prepped yarn and warped evenly with steady tension.
Celebrate your ready loom. Start weaving a simple coaster today. Try colorful weft next, or scale up to scarves.
Share your first weave in comments. Pin this for craft nights. Turn cardboard into keepsakes that last.